Difference between revisions of "Importing a CAD Model"
From ArcoWiki
| (One intermediate revision by one other user not shown) | |||
| Line 6: | Line 6: | ||
In order to import a model proceed as follow: | In order to import a model proceed as follow: | ||
# Open a New or an Existing Project | # Open a New or an Existing Project | ||
| − | # Click in the CAD | + | # Click in the [[Cad View|CAD view]] |
# Click on the ''Include Models'' menu | # Click on the ''Include Models'' menu | ||
# Browse the file to be included, use the filters in order to select the correct format | # Browse the file to be included, use the filters in order to select the correct format | ||
| Line 20: | Line 20: | ||
</gallery> | </gallery> | ||
| − | [[it: | + | |
| + | [[it:Importazione di un modello CAD]] | ||
| + | [[zh-cn:导入CAD模型]] | ||
| + | [[pt:Importando um modelo CAD]] | ||
| + | [[de:Importieren eines CAD-Modells]] | ||
| + | [[es:Importación de un modelo de CAD]] | ||
| + | [[en: Importing a CAD Model]] | ||
[[Category:Help_On_Line]] | [[Category:Help_On_Line]] | ||
Latest revision as of 07:41, 11 June 2018

To import a CAD model it is necessary the have ARCOCAD, the version QUICK and GRAPHICS are not enabled to import models.
The default format that can be imported is IGES, all the other model are available by using an optional license that need to be activated in the license manager.
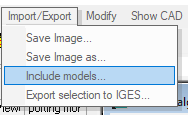
In order to import a model proceed as follow:
- Open a New or an Existing Project
- Click in the CAD view
- Click on the Include Models menu
- Browse the file to be included, use the filters in order to select the correct format
- Select the file name
- Click on Open
When importing a CAD model it is not recommended to use a network or portable drives, the use of network or portable drives slow the import process.
Including a File
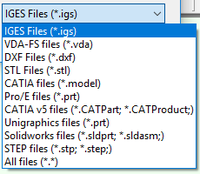
Available CAD Formats

