Difference between revisions of "Open An Output Device to Build a Q-DAS Compliant Ouput"
From ArcoWiki
(Created page with "The creation of an output complaint to Q-DAS, from the DMIS programming point of view, it is no different that any other output.<br /> The only measure difference are:...") |
|||
| (4 intermediate revisions by one other user not shown) | |||
| Line 1: | Line 1: | ||
The creation of an output complaint to [[Q-DAS]], from the [[DMIS]] programming point of view, it is no different that any other output.<br /> | The creation of an output complaint to [[Q-DAS]], from the [[DMIS]] programming point of view, it is no different that any other output.<br /> | ||
| − | The only | + | The only difference are: |
| − | * Association of the Correct K-Variables (See [[Creation of Q-DAS K Variables]]) | + | * Association of the Correct K-[[Variables]] (See [[Creation of Q-DAS K Variables]]) |
* Open one of the two different [[Q-DAS]] compliant output device. | * Open one of the two different [[Q-DAS]] compliant output device. | ||
<br /> | <br /> | ||
| Line 17: | Line 17: | ||
|- | |- | ||
|border="1" style= width:50px; text-align:center;|3 | |border="1" style= width:50px; text-align:center;|3 | ||
| − | |border="1" style= width:300px; text-align:left;|Select | + | |border="1" style= width:300px; text-align:left;|*Select “Staus-> Open” <br /> |
| − | |border="1" style= width:500px; text-center;| [[File: | + | *"Device -> File"<br /> |
| + | *"Format -> Vendor (select from the list Either '''QSSTATQ''' or '''QSSTATD'''" | ||
| + | |border="1" style= width:500px; text-center;| [[File:Q-DasOption.PNG]] | ||
|- | |- | ||
|border="1" style= width:50px; text-align:center;|4 | |border="1" style= width:50px; text-align:center;|4 | ||
| − | |border="1" style= width:300px; text-align:left;| Select “Add” | + | |border="1" style= width:300px; text-align:left;| Select “Add” |
| − | |border="1" style= width:500px; text-center;| | + | |border="1" style= width:500px; text-center;| |
|- | |- | ||
|border="1" style= width:50px; text-align:center;|5 | |border="1" style= width:50px; text-align:center;|5 | ||
| − | |border="1" style= width:300px; text-align:left;| | + | |border="1" style= width:300px; text-align:left;|Click "Ok" |
| − | + | |border="1" style= width:500px; text-center;| | |
| − | |||
| − | |||
| − | |border="1" style= width:500px; text-center;| | ||
|- | |- | ||
|border="1" style= width:50px; text-align:center;|6 | |border="1" style= width:50px; text-align:center;|6 | ||
| − | |border="1" style= width:300px; text-align:left;| | + | |border="1" style= width:300px; text-align:left;|Perform the Output of the Feature as usually done. |
| + | |border="1" style= width:500px; text-center;| | ||
|- | |- | ||
|border="1" style= width:50px; text-align:center;|7 | |border="1" style= width:50px; text-align:center;|7 | ||
| − | |border="1" style= width:300px; text-align:left;|Close | + | |border="1" style= width:300px; text-align:left;|Remember to [[Close the output device]] (DISPLY/OFF) and the end of the program |
| + | |border="1" style= width:500px; text-center;| | ||
|} | |} | ||
| − | |||
| − | |||
| − | |||
| − | |||
| − | * | + | == Differences Between QSSTATQ and QSSTATD == |
| − | + | *'''QSSTATQ''': The Output produces a [[Q-DAS|Q-das]] file with extension ".dfq" that contains all the measured values and the nominal definition. | |
| − | + | *'''QSSTATD''': The Output produces two [[Q-DAS|Q-das]] files; one with extension ".dfd" that contains all the measured values, another with extension ".dfx" that contains all the nominal definition. | |
| + | The choice between the two format depends of the settings in the Software [[Q-DAS|Q-Das]]. Please refer to [[Q-DAS|Q-Das]] guide for the decision. | ||
| − | |||
| − | |||
| − | |||
| − | |||
| − | |||
| − | + | [[it:Aprire un dispositivo di output per creare un output compatibile con QDAS]] | |
| − | + | [[zh-cn:打开输出设备以构建符合QDAS标准的输出]] | |
| + | [[pt:Abra um dispositivo de saída para criar uma saída compatível com QDAS]] | ||
| + | [[de:Öffnen Sie ein Ausgabegerät, um eine QDAS-kompatible Ausgabe zu erstellen]] | ||
| + | [[es:Abra un dispositivo de salida para generar una salida compatible con QDAS]] | ||
| + | [[en:Open An Output Device to Build a Q-DAS Compliant Ouput]] | ||
| − | + | [[Category:Help_On_Line]] | |
| − | |||
| − | |||
| − | |||
| − | |||
| − | |||
Latest revision as of 07:38, 14 June 2018
The creation of an output complaint to Q-DAS, from the DMIS programming point of view, it is no different that any other output.
The only difference are:
- Association of the Correct K-Variables (See Creation of Q-DAS K Variables)
- Open one of the two different Q-DAS compliant output device.
Opening a Q-DAS Compliant Output Device
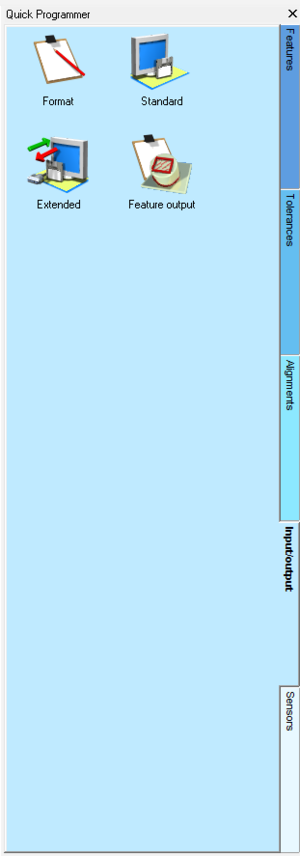
| 1 | Activate the INPUT/OUTPUT Tab in Arco Quick Programmer | |
| 2 | Double Clink on "Standard" to open a standard output device. | 
|
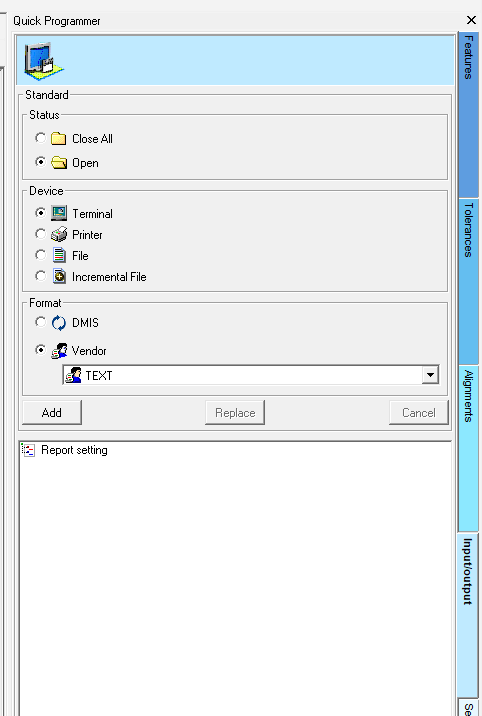
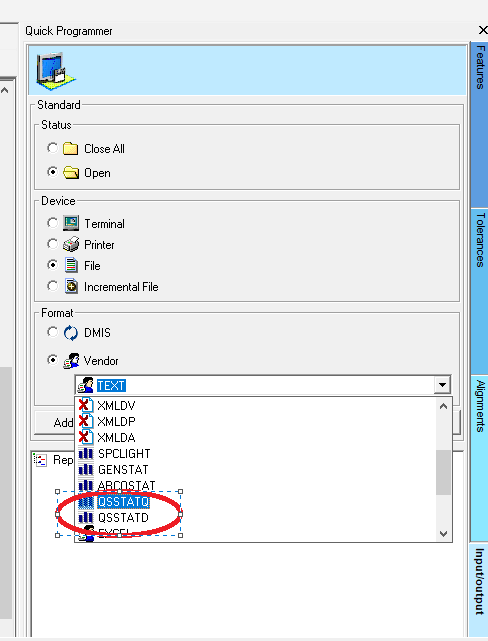
| 3 | *Select “Staus-> Open”
|

|
| 4 | Select “Add” | |
| 5 | Click "Ok" | |
| 6 | Perform the Output of the Feature as usually done. | |
| 7 | Remember to Close the output device (DISPLY/OFF) and the end of the program |
Differences Between QSSTATQ and QSSTATD
- QSSTATQ: The Output produces a Q-das file with extension ".dfq" that contains all the measured values and the nominal definition.
- QSSTATD: The Output produces two Q-das files; one with extension ".dfd" that contains all the measured values, another with extension ".dfx" that contains all the nominal definition.
The choice between the two format depends of the settings in the Software Q-Das. Please refer to Q-Das guide for the decision.
