Difference between revisions of "Creation of Q-DAS K Variables"
From ArcoWiki
(Created page with "In order to associate the correct K Variable to the Q-DAS file format it is necessary to follow this procedure: #Run ARCO CONTROL PANEL #Open QIS dialog bo...") |
m (The LinkTitles extension automatically added links to existing pages (<a rel="nofollow" class="external free" href="https://github.com/bovender/LinkTitles">https://github.com/bovender/LinkTitles</a>).) |
||
| (7 intermediate revisions by 2 users not shown) | |||
| Line 1: | Line 1: | ||
| − | In order to associate the correct [[K variable|K Variable]] to the [[Q-DAS]] file format it is | + | In order to associate the correct [[K variable|K Variable]] to the [[Q-DAS]] file format it is necessarycreate a list of K [[Variables]] in the DB and then use it in ARCO.<br/> |
| + | == Definition of the K Variables == | ||
| − | + | {|border="1" | |
| − | + | |border="1" style= width:50px; text-align:center;|1 | |
| − | [[File:Qdas1.png]] | + | |border="1" style= width:300px; text-align:left;|Run ARCO [[Control Panel|CONTROL PANEL]] |
| − | + | |border="1" style= width:500px; text-center;| | |
| − | [[File:Qdas2.png]] | + | |- |
| − | + | |border="1" style= width:50px; text-align:center;|2 | |
| − | [[File:Qdas3.png]] | + | |border="1" style= width:300px; text-align:left;|Open QIS dialog box |
| − | + | |border="1" style= width:500px; text-center;| [[File:Qdas1.png]] | |
| − | + | |- | |
| − | + | |border="1" style= width:50px; text-align:center;|3 | |
| − | + | |border="1" style= width:300px; text-align:left;|Select “Custom variables” | |
| − | [[File:Qdas4.png]] | + | |border="1" style= width:500px; text-center;| [[File:Qdas2.png]] |
| + | |- | ||
| + | |border="1" style= width:50px; text-align:center;|4 | ||
| + | |border="1" style= width:300px; text-align:left;| Select “Add” QIS dialog box to add the new [[Variable]], a default name is given and the [[variable]] it is added to the list | ||
| + | |border="1" style= width:500px; text-center;| [[File:Qdas3.png]] | ||
| + | |- | ||
| + | |border="1" style= width:50px; text-align:center;|5 | ||
| + | |border="1" style= width:300px; text-align:left;|Double click on the fields in order to: | ||
| + | *Rename the [[Variable]] | ||
| + | *Associate the [[Q-DAS]] K value | ||
| + | *Add a description of the custom [[Variable]] | ||
| + | |border="1" style= width:500px; text-center;| [[File:Qdas4.png]] | ||
| + | |- | ||
| + | |border="1" style= width:50px; text-align:center;|6 | ||
| + | |border="1" style= width:300px; text-align:left;|Repeat steps 4-5 to add as many [[variable]] are required | ||
| + | |- | ||
| + | |border="1" style= width:50px; text-align:center;|7 | ||
| + | |border="1" style= width:300px; text-align:left;|Close CONTROL PANEL and Run ARCO to [[test]] the output (Open a new project called “QISTest”) | ||
| + | |} | ||
| − | |||
| − | + | == Using the Variables and Send it to ARCO == | |
| − | + | *Setup a QDAS output from Panel “Input/Output” -> “Standard” ->”File” -> “QSSTATQ”<br/> | |
| + | *Click on “QIS Setup” to open the dialog | ||
| + | [[File:Qdas5.png]]<br/> | ||
| − | + | *Click on “Advanced” and choose the “Custom [[Variable]]” in order to add to the output the [[variable]] that has been created.<br/> | |
| − | Click on | + | *Type the value in the dedicated space (Red Arrow).<br/> |
| + | *Click “Add to Program” to store the instruction<br/> | ||
| − | |||
| − | |||
| − | |||
| − | |||
| − | |||
| − | |||
| − | |||
| − | |||
| − | |||
| − | |||
| − | |||
| − | |||
| − | |||
| − | |||
| − | |||
| − | |||
| − | |||
| − | |||
The [[DMIS]] result should be: | The [[DMIS]] result should be: | ||
| + | DISPLY/STOR,V(QSSTATQ) | ||
| + | Q(QIS_MYQISVARIABLE)=QISDEF/'MYQISVARIABLE','Value of the [[Variable]]' | ||
| + | R(RCLAB1)=REPORT/Q(QIS_MYQISVARIABLE)<br/> | ||
| + | OUTPUT/R(RCLAB1) [[File:Qdas6.png]] | ||
| − | + | *[[Close the output device]] from the Panel “Input/Output” -> “Standard” ->”Close All” | |
| − | + | *Go in the Report folder and open the file “QIS-Test.dfq”. | |
| − | |||
| − | |||
| − | |||
| − | |||
| − | |||
| − | |||
| − | Close the output device from the Panel “Input/Output” -> “Standard” ->”Close All” | ||
| − | |||
| − | |||
The result is a standard [[Q-DAS]] file as follow: | The result is a standard [[Q-DAS]] file as follow: | ||
| + | K0100 0 | ||
| + | K1204 18.01.2012/08:28:54 | ||
| + | K1205 18.01.2012/08:39:40 | ||
| + | K1500 | ||
| + | K1500 VALUE OF THE [[Variable|VARIABLE]] | ||
| − | + | [[it:Creazione di variabili Q-DAS K]] | |
| − | + | [[zh-cn:创建Q-DAS K变量]] | |
| − | + | [[pt:Criação de variáveis Q-DAS K]] | |
| − | + | [[de:Erstellung von Q-DAS K-Variablen]] | |
| − | + | [[es:Creación de variables Q-DAS K]] | |
| + | [[en:Creation of Q-DAS K Variables]] | ||
[[Category:Generic]] | [[Category:Generic]] | ||
Latest revision as of 09:31, 12 February 2021
In order to associate the correct K Variable to the Q-DAS file format it is necessarycreate a list of K Variables in the DB and then use it in ARCO.
Definition of the K Variables
| 1 | Run ARCO CONTROL PANEL | |
| 2 | Open QIS dialog box | 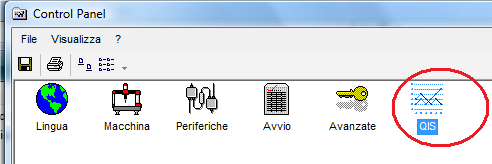
|
| 3 | Select “Custom variables” | 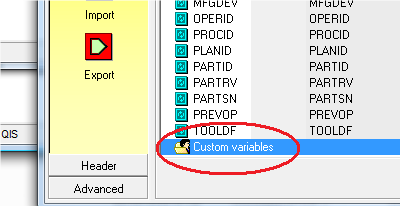
|
| 4 | Select “Add” QIS dialog box to add the new Variable, a default name is given and the variable it is added to the list | 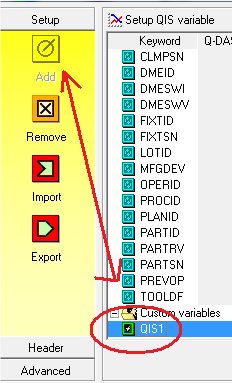
|
| 5 | Double click on the fields in order to: | 
|
| 6 | Repeat steps 4-5 to add as many variable are required | |
| 7 | Close CONTROL PANEL and Run ARCO to test the output (Open a new project called “QISTest”) |
Using the Variables and Send it to ARCO
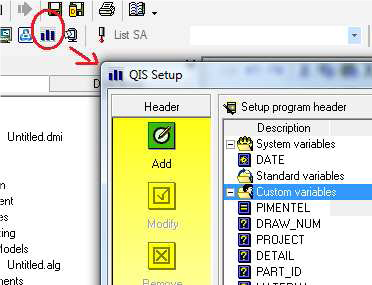
- Setup a QDAS output from Panel “Input/Output” -> “Standard” ->”File” -> “QSSTATQ”
- Click on “QIS Setup” to open the dialog
- Click on “Advanced” and choose the “Custom Variable” in order to add to the output the variable that has been created.
- Type the value in the dedicated space (Red Arrow).
- Click “Add to Program” to store the instruction
The DMIS result should be:
DISPLY/STOR,V(QSSTATQ)
Q(QIS_MYQISVARIABLE)=QISDEF/'MYQISVARIABLE','Value of the Variable'
R(RCLAB1)=REPORT/Q(QIS_MYQISVARIABLE)

OUTPUT/R(RCLAB1)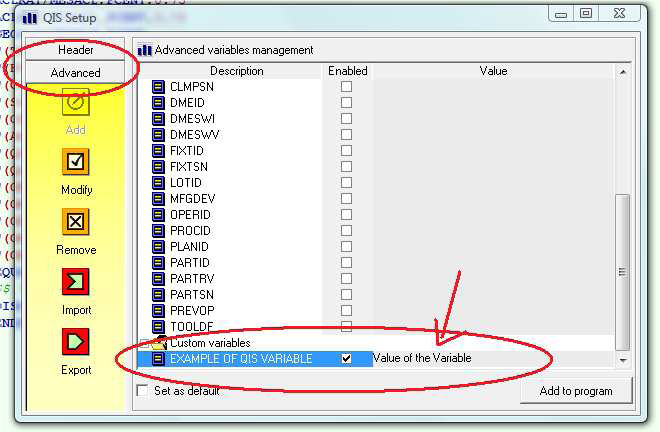
- Close the output device from the Panel “Input/Output” -> “Standard” ->”Close All”
- Go in the Report folder and open the file “QIS-Test.dfq”.
The result is a standard Q-DAS file as follow:
K0100 0
K1204 18.01.2012/08:28:54
K1205 18.01.2012/08:39:40
K1500
K1500 VALUE OF THE VARIABLE
