Difference between revisions of "Creation of Q-DAS K Variables"
From ArcoWiki
(Created page with "In order to associate the correct K Variable to the Q-DAS file format it is necessary to follow this procedure: #Run ARCO CONTROL PANEL #Open QIS dialog bo...") |
|||
| Line 2: | Line 2: | ||
#Run ARCO CONTROL PANEL | #Run ARCO CONTROL PANEL | ||
| − | #Open QIS dialog box | + | #Open QIS dialog box |
[[File:Qdas1.png]] | [[File:Qdas1.png]] | ||
| − | # Select “Custom variables” | + | # Select “Custom variables” [[File:Qdas2.png]] |
| − | [[File:Qdas2.png]] | + | #Select “Add” QIS dialog box to add the new [[Variable]], a default name is given and the [[variable]] it is added to the list [[File:Qdas3.png]] |
| − | #Select “Add” QIS dialog box to add the new [[Variable]], a default name is given and the [[variable]] it is added to the list | ||
| − | [[File:Qdas3.png]] | ||
#Double click on the fields in order to: | #Double click on the fields in order to: | ||
| − | •Rename the [[Variable]] | + | •Rename the [[Variable]] |
| − | •Associate the [[Q-DAS]] K value | + | •Associate the [[Q-DAS]] K value |
| − | •Add a description of the custom [[Variable]] | + | •Add a description of the custom [[Variable]] [[File:Qdas4.png]] |
| − | [[File:Qdas4.png]] | + | #Repeat steps 4-5 to add as many [[variable]] are required |
| − | + | #Close CONTROL PANEL and Run ARCO to test the output (Open a new project called “QISTest”) | |
| − | + | #Setup a QDAS output from Panel “Input/Output” -> “Standard” ->”File” -> “QSSTATQ” | |
| − | + | #Click on “QIS Setup” to open the dialog [[File:Qdas5.png]] | |
| − | + | #Click on “Advanced” and choose the “Custom [[Variable]]” in order to add to the output the [[variable]] that has been created | |
| − | Repeat steps 4-5 to add as many [[variable]] are required | + | Type the value in the dedicated space (Red Arrow) |
| − | + | Click “Add to Program” to store the instruction | |
| − | |||
| − | |||
| − | |||
| − | |||
| − | Close CONTROL PANEL and Run ARCO to test the output (Open a new project called “QISTest”) | ||
| − | |||
| − | |||
| − | Setup a QDAS output from Panel “Input/Output” -> “Standard” ->”File” -> “QSSTATQ” | ||
| − | |||
| − | |||
| − | Click on “QIS Setup” to open the dialog. | ||
| − | |||
| − | |||
| − | |||
| − | |||
| − | |||
| − | |||
| − | |||
| − | |||
| − | Click on “Advanced” and choose the “Custom [[Variable]]” in order to add to the output the [[variable]] that has been created | ||
| − | Type the value in the dedicated space (Red Arrow) | ||
| − | Click “Add to Program” to store the instruction | ||
The [[DMIS]] result should be: | The [[DMIS]] result should be: | ||
| Line 46: | Line 22: | ||
Q(QIS_MYQISVARIABLE)=QISDEF/'MYQISVARIABLE','Value of the [[Variable]]' | Q(QIS_MYQISVARIABLE)=QISDEF/'MYQISVARIABLE','Value of the [[Variable]]' | ||
R(RCLAB1)=REPORT/Q(QIS_MYQISVARIABLE) | R(RCLAB1)=REPORT/Q(QIS_MYQISVARIABLE) | ||
| − | OUTPUT/R(RCLAB1) | + | OUTPUT/R(RCLAB1) [[File:Qdas6.png]] |
| − | + | #Close the output device from the Panel “Input/Output” -> “Standard” ->”Close All” | |
| − | + | #Go in the Report folder and open the file “QIS-Test.dfq”. | |
| − | |||
| − | |||
| − | Close the output device from the Panel “Input/Output” -> “Standard” ->”Close All” | ||
| − | |||
| − | |||
The result is a standard [[Q-DAS]] file as follow: | The result is a standard [[Q-DAS]] file as follow: | ||
Revision as of 13:25, 26 August 2016
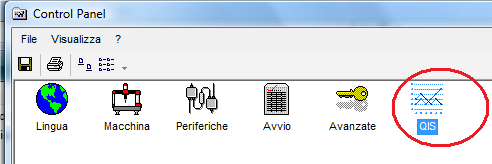
In order to associate the correct K Variable to the Q-DAS file format it is necessary to follow this procedure:
- Run ARCO CONTROL PANEL
- Open QIS dialog box
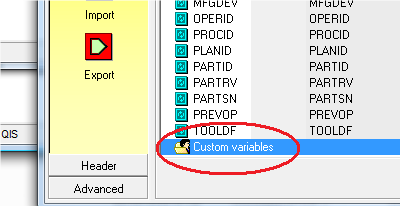
- Select “Custom variables”
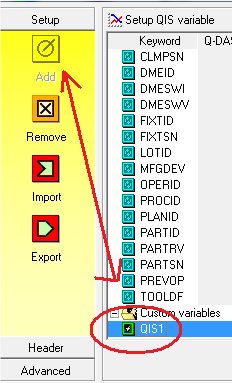
- Select “Add” QIS dialog box to add the new Variable, a default name is given and the variable it is added to the list
- Double click on the fields in order to:
•Rename the Variable
•Associate the Q-DAS K value
•Add a description of the custom Variable
- Repeat steps 4-5 to add as many variable are required
- Close CONTROL PANEL and Run ARCO to test the output (Open a new project called “QISTest”)
- Setup a QDAS output from Panel “Input/Output” -> “Standard” ->”File” -> “QSSTATQ”
- Click on “QIS Setup” to open the dialog
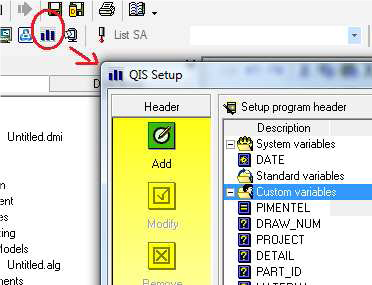
- Click on “Advanced” and choose the “Custom Variable” in order to add to the output the variable that has been created
Type the value in the dedicated space (Red Arrow) Click “Add to Program” to store the instruction The DMIS result should be:
DISPLY/STOR,V(QSSTATQ)
Q(QIS_MYQISVARIABLE)=QISDEF/'MYQISVARIABLE','Value of the Variable'
R(RCLAB1)=REPORT/Q(QIS_MYQISVARIABLE)
OUTPUT/R(RCLAB1) 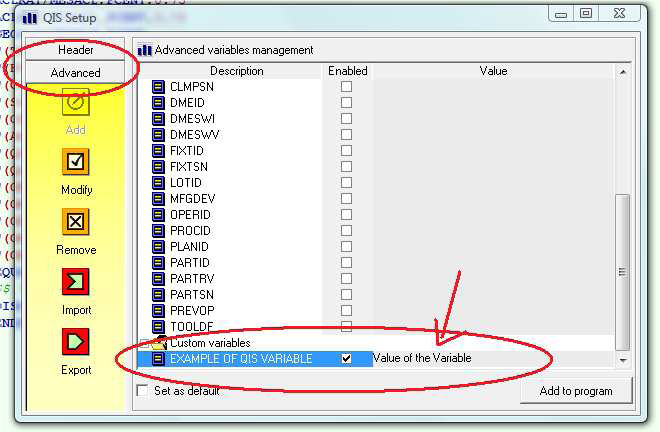
- Close the output device from the Panel “Input/Output” -> “Standard” ->”Close All”
- Go in the Report folder and open the file “QIS-Test.dfq”.
The result is a standard Q-DAS file as follow:
K0100 0 K1204 18.01.2012/08:28:54 K1205 18.01.2012/08:39:40 K1500 K1500 VALUE OF THE VARIABLE
