Difference between revisions of "Edit the Path of A Feature"
(Created page with "it:Modifica dei punti misurati in una feature thumb|right|400px|Open the Edit Dialog In order to edit the measuring path of a feature, it is necessary to...") |
m (The LinkTitles extension automatically added links to existing pages (<a rel="nofollow" class="external free" href="https://github.com/bovender/LinkTitles">https://github.com/bovender/LinkTitles</a>).) |
||
| (2 intermediate revisions by 2 users not shown) | |||
| Line 2: | Line 2: | ||
[[File:Edit.png|thumb|right|400px|Open the Edit Dialog]] | [[File:Edit.png|thumb|right|400px|Open the Edit Dialog]] | ||
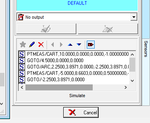
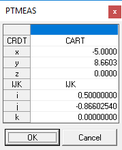
In order to edit the measuring path of a feature, it is necessary to change the PTMEAS, which are the contact points.<br /> | In order to edit the measuring path of a feature, it is necessary to change the PTMEAS, which are the contact points.<br /> | ||
| − | This can be done by manually edit the PTMEAs in the [[editor]], or by graphically change it the CAD view.<br /> | + | This can be done by manually edit the PTMEAs in the [[editor]], or by graphically change it the [[Cad View|CAD view]].<br /> |
<br /> | <br /> | ||
| − | In order to graphically change a path in the CAD view the procedure is as follow: | + | In order to graphically change a path in the [[Cad View|CAD view]] the procedure is as follow: |
#Open the Editor view | #Open the Editor view | ||
#Find the feature that need to be modified | #Find the feature that need to be modified | ||
| Line 12: | Line 12: | ||
#Select Edit | #Select Edit | ||
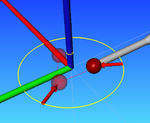
| − | At this time an edit dialog will be opened in the Tab panel and, in the CAD View, the representation on the measuring path will be shown.<br /> | + | At this time an edit dialog will be opened in the Tab panel and, in the [[Cad View|CAD View]], the representation on the measuring path will be shown.<br /> |
by double click on each individual point it is possible activate the edit dialog when the PTMEAS can be manually edit.<br /> | by double click on each individual point it is possible activate the edit dialog when the PTMEAS can be manually edit.<br /> | ||
At the same time, by clicking on the CAD a new point, the previous point will be moved to the new location, in order to confirm the modification it is necessary to click with the right mouse button or press ok in the dialog.<br /> | At the same time, by clicking on the CAD a new point, the previous point will be moved to the new location, in order to confirm the modification it is necessary to click with the right mouse button or press ok in the dialog.<br /> | ||
| Line 25: | Line 25: | ||
[[File:Simulate.PNG|thumb|right|400px|Click to Simulate the new path]] | [[File:Simulate.PNG|thumb|right|400px|Click to Simulate the new path]] | ||
[[File:Confirm Feature.PNG|thumb|right|400px|Click to Confirm the Modification]] | [[File:Confirm Feature.PNG|thumb|right|400px|Click to Confirm the Modification]] | ||
| + | |||
| + | [[it:Modifica il percorso di una caratteristica]] | ||
| + | [[zh-cn:编辑特征的路径]] | ||
| + | [[pt:Edite o caminho de um recurso]] | ||
| + | [[de:Bearbeiten Sie den Pfad eines Features]] | ||
| + | [[es:Edite la ruta de una característica]] | ||
| + | [[en:Edit the Path of A Feature]] | ||
[[Category:Help_On_Line]] | [[Category:Help_On_Line]] | ||
Latest revision as of 09:34, 12 February 2021

In order to edit the measuring path of a feature, it is necessary to change the PTMEAS, which are the contact points.
This can be done by manually edit the PTMEAs in the editor, or by graphically change it the CAD view.
In order to graphically change a path in the CAD view the procedure is as follow:
- Open the Editor view
- Find the feature that need to be modified
- Click on the line where the command
MEASfor that specific feature is located - Right mouse click
- Select Edit
At this time an edit dialog will be opened in the Tab panel and, in the CAD View, the representation on the measuring path will be shown.
by double click on each individual point it is possible activate the edit dialog when the PTMEAS can be manually edit.
At the same time, by clicking on the CAD a new point, the previous point will be moved to the new location, in order to confirm the modification it is necessary to click with the right mouse button or press ok in the dialog.
- Edit a Measuring Path


In order to validate the changes the new path must be simulated by pressing the button Simulate and after that, confirm the feature in order to update the program.

